User Login Page
What is my user name?
Your user name is the email address that you used during registration to any of the following USP resources and/or applications:
- USP-NF Online
- Pharmacopeial Forum (PF) Online
- Food Chemicals Codex (FCC) Forum
- Chromatographic Columns
- Food Chemicals Codex (FCC) Online
- Herbal Medicines Compendium
- Call for Candidates
- Committee Portal
- Call for Resolutions
- USP Conferences and Events
- USP Education
- USP Donor Submission Portal
If you have not registered or want to register with another email, please create a new account using the “Create a new USP Access Point account, if you do not have one” link on the login page.
Note: After 5 incorrect password entries, the system will lock your account. Use the “Forgot password” link to reset your password.
I don't remember the email address that I registered to USP Access Point account.
To find your account email address, click the “Forgot password” link on the login page. On the Forgot password page, enter your email address, take the “reCAPTCHA” challenge, and then click the Next button. If a wrong email address is submitted, the system displays, “You have entered an invalid email address, please enter your valid Access Point account email again. Click here, if you wish to create a new Access Point account”. Try another email address to see if it is valid. After a correct email address is recognized, you can reset your password by accessing your email and following the instructions to reset the password.
If you have not registered or want to register with another email, please create a new account using the “Create a new USP Access Point account, if you do not have one” link.
Note: For an already existing account, please read the section "What is my user name?" to find out what resources and applications are supported with the registered account.
IMPORTANT: If you want to bookmark an USP application, bookmark the page after you are logged into the application. The USP Access Point login page SHOULD NOT be bookmarked for accessing the application page.
I am unable to sign-in, what do I do?
Web browsers save old information. This can be fixed by clearing the browser’s cache and cookies, restarting the browser, and signing in again.
After 5 incorrect password entries, the system will lock your account. If you still cannot log in, use the “Forgot password” link to reset your password. Your account will be unlocked after a successful password reset. You will then be able to use your email address and new password to log in.
Note: Contact us for help if you still cannot log in.
My account is locked, what do I do?
After 5 incorrect password entries, the system will lock your account. Use the “Forgot password” link to reset your password. Your account will be unlocked after a successful password reset. You will be able to use your email address and new password to log in.
Note: Contact us for help if you still cannot log in.
My account was created by my USP-NF Online system administrator, how do I reset my password?
If the USP-NF Online system administrator has created the Access Point account for you by associating you to the USP-NF subscription key, you MUST follow the instructions in the email to setup your password. This action activates your Access Point account and you become a verified user so that you can access the USP-NF Online product.
User Account Registration Page
What are the steps for user registration?
Want to watch the video tutorial instead? Read the section Access Point Registration Tutorial.
Once you start the registration process, complete the following steps for successful account creation:
- Enter all required information (marked with red asterisk *), select reCAPTCHA information, and select to agree to the USP Privacy Policy in the "Create Account" page.
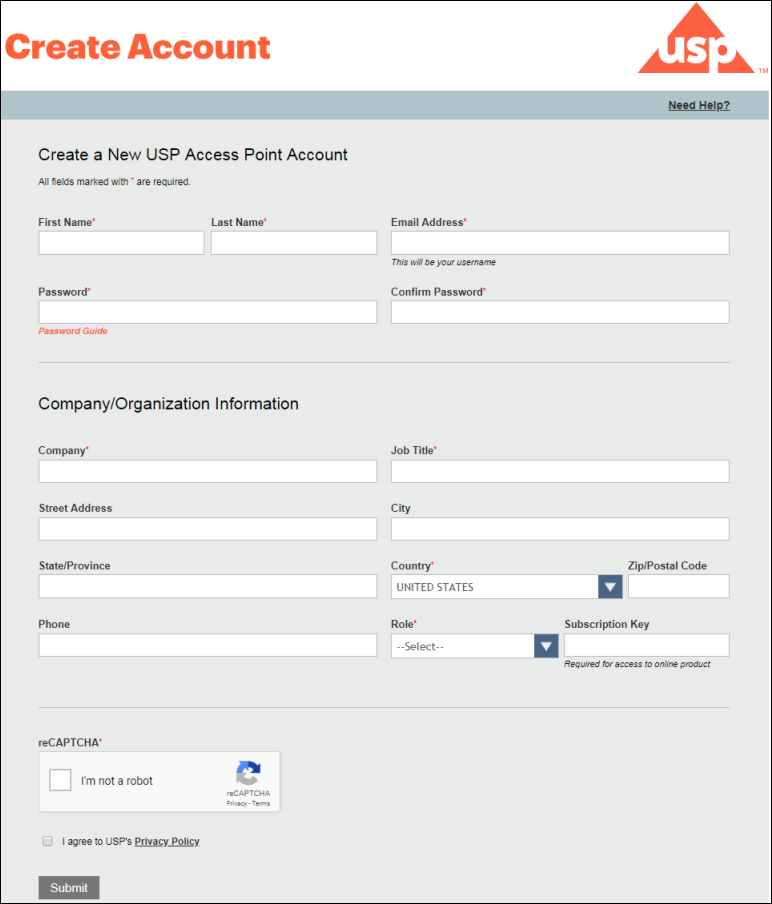
Note: The Role and Subscription Key are two new fields. If your role is not listed in the dropdown box, then choose “Other”.
IMPORTANT: The Subscription Key field is for the paid subscribers of USP resources, such as USP-NF Online who have a valid subscription key. This ensures that you get automatically associated with your subscription as soon as you verify your account to start using the application.
Note: The USP Education users will also see an Additional Profile Information section in the Create Account page. See the next question for more information.
- Click the Submit button. The following message will display:
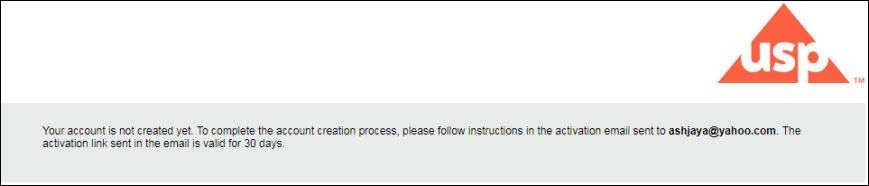
Note: If you have created an account (using the same email) before, or if your account has been created by your system administrator, and have not activated it, you will get a message, "An account is pending activation for this email address. Click here to receive the account activation email again to complete the account creation process."- Close the registration window.
- A registration verification email is sent as soon as the Submit button is clicked on the User Registration page. The activation link sent in the email is valid for 30 days. An example email is shown below:
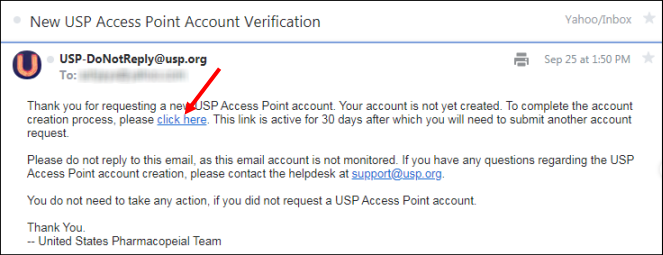
- To activate your account, open your email and click the “click here” link (see arrow above). A page is launched to show your profile being configured. An example is shown below:
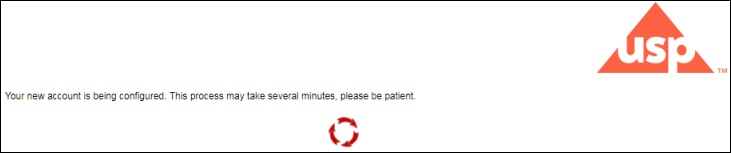
- After successful account configuration, a Continue button is displayed (see below).
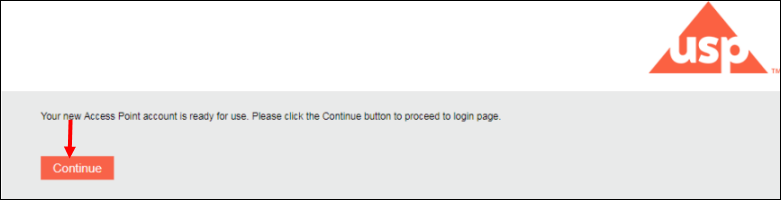
- After successful account configuration, a Continue button is displayed (see below).
- Click the Continue button. The Login page will be launched.
- Log in using the registered email and password. You'll be directed to the application where you wanted to register your account. To keep yourself signed in, select the Keep me signed in option on the login page.
Note: If you have not created your account through any USP application, but have used the https://register.usp.org URL, then you will be taken to the Manage Subscriptions page of Access Point.
Why do I see the "Additional Profile Information" tab after login?
The Additional Profile Information tab collects information required for USP training class registration, such as phone number, job function, years of experience, degree, etc. for all USP Education users. This tab is displayed only if any of the required information is missing. You can always update this information using the Edit Profile feature.
Upon submitting this form, all users will need to login again to access the USP Education website.
What USP resources and applications use this Access Point account?
The following USP products will use this account or username information:
- USP-NF Online
- Pharmacopeial Forum (PF) Online
- Food Chemicals Codex (FCC) Forum
- Chromatographic Columns
- Food Chemicals Codex (FCC) Online
- Herbal Medicines Compendium
- Call for Candidates
- Committee Portal
- Call for Resolutions
- USP Conferences and Events
- USP Education
- USP Donor Submission Portal
Why am I getting an “account already exists for this email address” message when registering?
If you have already created an account to access any of the USP resources and/or applications listed in the question above, you cannot create another account using the same email address. Log in using your existing email address and password. If you do not remember your password, click the “Forgot Password” link in the Login page to reset your password.
Note: If you have created an account before, using the same email, and have not activated it, you will get a message, “An account is pending activation for this email address. Click here to receive the account activation email again to complete the account creation process.”
Note: The USP-NF Online users whose accounts were created by their system administrator by using the multiple account upload feature will receive a message as shown below:

If you still want to create another account, a different email address must be used.
What are the password guidelines?
The following guidelines are essential when creating a password for USP Access Point account:
- Password is case sensitive.
- Must not include part of your name or username.
- Must not include a common word or commonly used sequence of characters.
- Must be at least 8 characters long and include at least one of each of the following:
- Uppercase or lowercase letter (A-Z or a-z)
- Number (0-9)
- Symbols (~, @, $, %, ^, _, -)
How do I take the reCAPTCHA verification?
On the Create Account page, select “I’m not a robot” checkbox to verify your identification. Follow the instructions to verify reCAPTCHA information and then click the Verify button. If you are unable to match graphics, either select your best guess or click the reload icon ![]() to generate another challenge.
to generate another challenge.
You also have an option to take an audible challenge by clicking the Headphone icon ![]() .
.
Why is an email confirmation required during the account creation?
The USP Access Point account gives you access to several USP resources and applications. Some of these resources and applications are used in standard setting processes and need to establish your identity. With a verified email, you will be able to perform self-service functions like resetting your password, etc. In addition, USP can also verify that the email address does not belong to someone else.
Forgot Password/Reset Password Page
How do I reset my password or what do I do if I forget my password?
The “Forgot password?” link on the login page allows you to reset your password. To reset your password, enter the following:
- Enter the email address you used in creating the USP account.
- Select “I’m not a robot” checkbox in reCAPTCHA and then take the verification challenge.
- Click Next to submit.
- Close the window.
- An activation link is sent to you in email. Open the activation link from your email to reset your password. Clicking at the activation link launches Update Password window.
- Update your password and then click the Change Password button. A confirmation message is displayed.
- Click the Continue button. You are now directed to the Login page.
Note: Please refer to the password guidelines before creating a new password.
Edit Profile Page
How do I edit my profile?
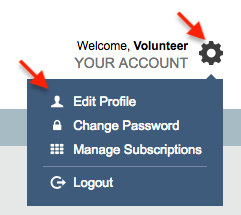
To edit your USP Access Point user profile, access My Profile option or click the Settings ![]() icon to select Edit Profile option.
icon to select Edit Profile option.
On the “Your Profile” tab, you can edit/add following information:
- First Name, Last Name
- Company
- Job Title
- Address
- Phone
- Role
After editing, click the Save Details button to update information.
IMPORTANT: If you are a USP Education user, you can also access the Additional Profile tab to edit your information on that page.
How do I change my password?
To change your password, take the following steps:
- Login to a USP resource or application.
- Click the Settings
 icon to select Change Password option from the dropdown menu. If you are in the Pharmacopeial Forum (PF) or Chromatographic Column application, then select My Profile option and then select Password tab to change password. The Password tab will be displayed on the Account Information page.
 - Enter your new password in the New Password and Confirm Password fields.
- Click the Change Password button to submit. Your new password is saved.
Note: In the Chromatographic Column application, click Resources>My Profile to access the Password tab.
Paid Resources Tab
What is the process of associating a subscription key to a paid resource?
To associate a subscription key, take the following steps:
- Login to the USP Access Point account: https://register.usp.org
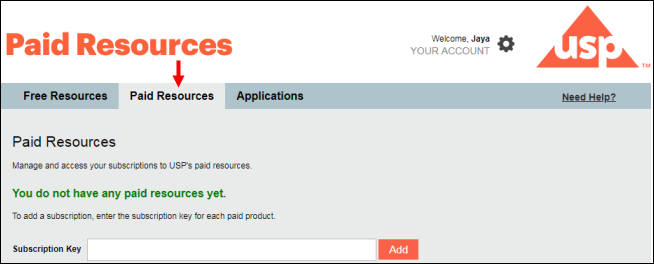
- Click the Paid Resources tab.

- In the Subscription Key field, enter the key you have received in your email after the product purchase.
- Click the Add button. This shows the associated resource listed at the bottom of the screen. An example is shown:
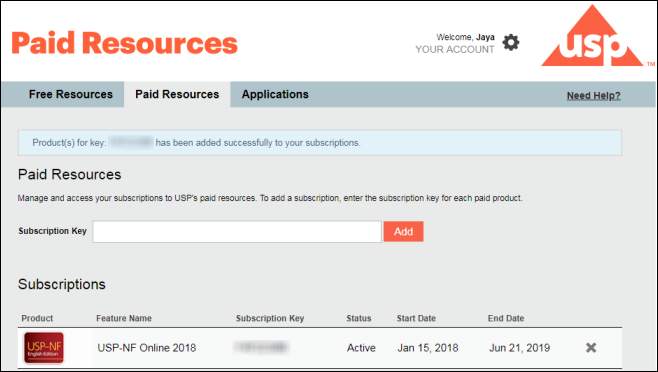
If you are subscribed to any other USP resource, add the subscription key here as well. - Click on the product icon to launch the application. This launches the application in another browser tab.
Can I remove my subscription key?
Yes, click the ![]() icon in the subscription line to remove a subscription from the list. It will ask for a confirmation before removing from this page.
icon in the subscription line to remove a subscription from the list. It will ask for a confirmation before removing from this page.
Free Resources Tab
What can I do in the Free Resources tab? Or, How do I subscribe to USP's free resources?
The Free Resources tab lists USP's freely available publications or applications that you can subscribe to. The following USP free resources will use the same Access Point account:
- Pharmacopeial Forum (PF) Online
- Food Chemicals Codex (FCC) Forum
- Chromatographic Columns
- Herbal Medicines Compendium
By default, you cannot access these applications until you subscribe. To subscribe to the free USP resources, select the check box next to these resources, and then click the  button. To launch a free resource, click at the hyperlinked resource name.
Applications Tab
What can I do in the Applications tab?
The Applications tab lists the following USP applications that you can access using your Access Point account:
- Call for Candidates
- Call for Resolutions - Access to this application will require additional USP approval. Please visit http://resolutions.usp.org/frequently-asked-questions for more information.
- USP Education
- Council of Experts - Access to this application will require additional USP approval. Please visit http://www.usp.org/about/volunteer-experts for more information on becoming a Council of Experts member.
- Donor Submission Portal – Access to this application will require additional USP approval. Please visit https://donors.usp.org for more information on creating a donor account.
Admin Tab
Overview
USP's System Administration License Management Tool (Admin Tool) is designed to administer and manage subscriptions within an organization and to monitor application usage. The tool will allow a system administrator (system admin) to assign users, create Access Point accounts, review which users are accessing the application, identify unused seats, and add or remove specific users as needed.
What are the responsibilities of the system admin?
The system admin is responsible for managing their organization's subscription by:
- Assigning users to the subscription keys to provide access to USP paid online resources such as USP-NF Online and Food Chemicals Codex (FCC) Online
- Disassociating users from the subscription key
- Creating USP Access Point Users in bulk and assigning them to their subscription key
- Managing and viewing the total number of seats for a subscription
How do I become a system admin?
To become a system admin, follow the steps outlined below:
- Purchase an online paid resource such as USP-NF or FCC from the USP iStore. After you buy a USP resource, you will receive a subscription key.
- If you are not an existing USP Access Point user, then follow the registration steps to create your account in Access Point. Use https://register.usp.org to launch the Access Point website.
- Log in to Access Point and associate the subscription to your account by going to the Paid Resources tab (see below).
- Contact your USP Account Manager here and ask them to assign you the system admin role.
Note: For one subscription, up to 5 users can be assigned the system admin role. These users must have created their Access Point accounts before they can be assigned the system admin role. - Your USP Account Manager will notify you once the system admin role has been designated to you within the Access Point system.
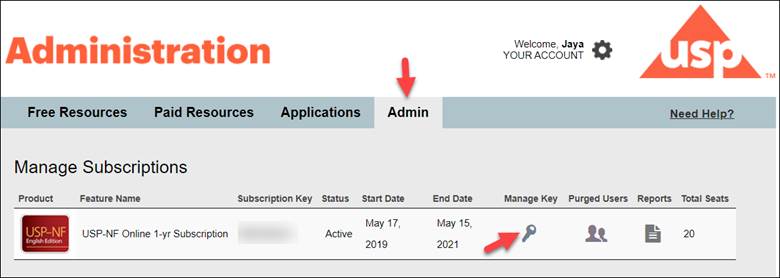
- After you have been assigned the system admin role, log in to the Access Point website again. You should be able see the Admin tab (see the screen below) which grants you access to USP's System Administration License Management Tool (Admin Tool).
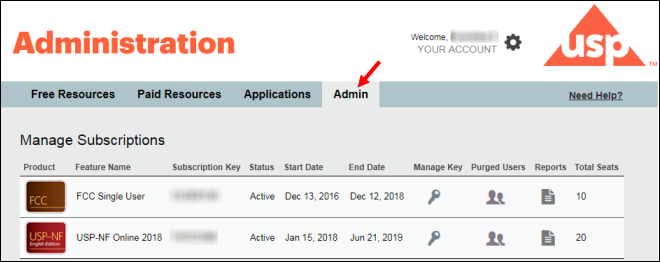
How do I navigate the Admin tab?
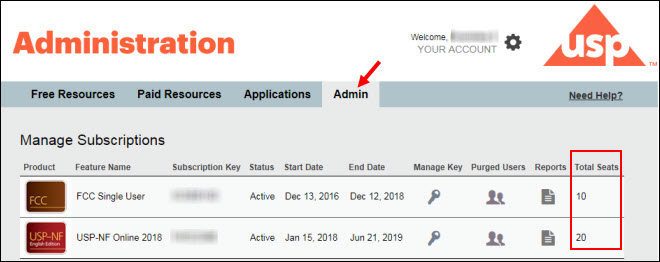
The Admin tab displays the list of paid USP product subscriptions that you can manage. It may display one or more products based on the number of subscription-based products you have purchased from USP.
The Admin tab displays the following information and will allow you to add or delete users into the product's subscription:
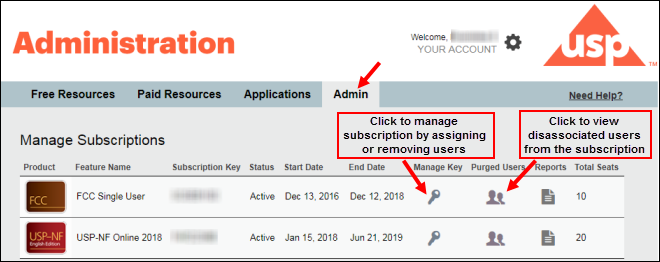
The following list explains each column in the Manage Subscriptions page of the Admin tab:
- Product- Displays the subscribed product icon that you can click to launch the product
- Feature Name- Displays the type of subscription purchased, e.g., Enterprise or Single User
- Subscription Key- Displays the subscription key of the product
- Status- Displays the subscription status
- Start Date- Displays the start date of the subscription
- End Date- Displays the subscription's expiration date
- Manage Key- Click the
 icon to start managing the product subscription for your organization's users. This will launch the "Manage Users for Key" page.
 - Purged Users- Click the
 icon to launch the "Purged Users" page to view the list of email addresses of users who have not verified their Access Point accounts within 30 days. After 30 days, the system deletes these accounts and frees up the subscription seats. Note: These users' accounts were created by the system admin.
 - Reports Click the
 icon to generate the product usage and login report of all users or a specific user in a subscription.
 - Total Seats- Displays the total number of seats for the paid subscription. You can only add users up to the maximum number of seats. All users, including system admins, count against this total.
What is a Verified user?
A Verified user is an individual who already has an Access Point account and has successfully verified their subscription using the email verification process. Click Access Point Registration Tutorial for a video tutorial on user registration or click User Account Registration Page for more information on email verification.
How do I associate a single user to the subscription key? Or, how do I associate an existing Access Point user with the subscription key?
Note: Ensure that the user already has an Access Point account and is a verified user. You must also know the user's registered email address.
To associate a single user with the product subscription:
- Log in to the Access Point (https://register.usp.org).
- Click on the Admin tab.
- In the "Manage Subscriptions" page, click the icon in the Manage Key column.
- In the "Manage Users for Key" page, click the
 button.
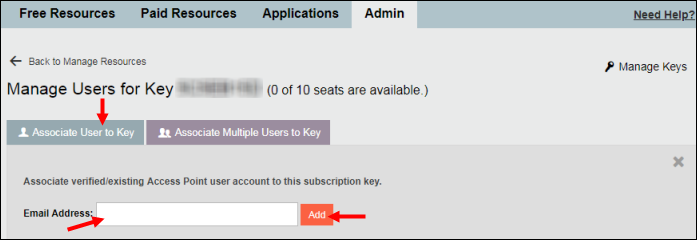
- Enter the user's email address in the Email Address text box.
- Click the
 button. A message will be displayed showing the successful completion of this process.
 - Refresh the page by pressing the
key on your keyboard. The added user will appear in the "Manage Users for Key" page list. The total number of seats for the subscription will also be updated to reflect the remaining seats.
Note: The assignment of the user will fail when the number of total seats in a product subscription is already taken. You will be notified in a message at the top of the page.
What does the Associate User to Key button do on the "Manage Users for Key" page?
The button will allow you to associate an existing verified Access Point user to the product subscription key. A verified user is an individual who already has an Access Point account and has successfully verified their subscription using the email verification process.
What does the Associate Multiple Users to Key button do on the "Manage Users for Key" page? Or, How do I add multiple users to a subscription?
The  button will allow you to add multiple users (Verified and Not Verified) and associate them to the product subscription key. When using this button, the system admin must take the following steps:
- Click the button on the "Manage Users for Key" page.
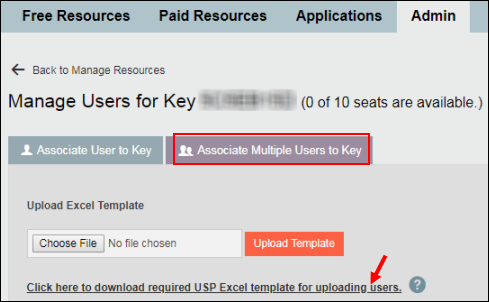
- Click the template file link (see arrow above) to download the USP-provided Excel template.
Note: You can only use the template provided by USP within this tool. Using another file format will result in an error message. - Populate the Excel file with the users' information. When entering user information in the Excel file, the following conditions must be met:
- All mandatory fields (marked with an asterisk [*] in the column heading) must be filled.
- The email address should be entered in the correct format.
- Save the Excel file.
- Click the
 button to locate the file and then click the
  button. After successful upload, a message will appear at the top of the page.
 - Refresh the page by pressing the
key on your keyboard. The added users will appear in the "Manage Users for Key" page list. The total number of seats for the subscription will also be updated to reflect the remaining seats.
Note: If the upload fails, you will receive a message indicating incomplete or wrong entries in the Excel file or that only some users are added. The message will specify the reason(s) for failure to upload and appropriate actions to fix the issue.
Note: This process will also create new Access Point accounts for those users who do not have Access Point accounts. Additionally, it will also associate those newly created account with the subscription key. However, the existing Access Point users only get associated with the subscription key. The following rules apply when users are associated with the subscription key:
- Users can only be added to the system using the Excel file supplied by USP.
- The number of users that will be added from the Excel file will depend on the number of remaining seats available in the subscription. If the number of seats available in the subscription is less than the number of users entered in the Excel sheet, the system will stop at the row where all the seats are filled and will generate an error message.
- If a user already has a USP Access Point account, but is not associated with the subscription key, the system associates the user's email address with the key and ignores all other fields for that particular row in the Excel file.
- An existing Access Point user will receive an email about their association with the subscription key.
- If a user does not have an Access Point account, the system will create an Access Point account for that user. The user will receive an email about the account creation with instructions to set up a password. The email also informs the user about the subscription to the product. After a user sets the password by clicking the email link, the user gains the status of Verified user.
- If a newly created Access Point user has not set up a password within 30 days of the email notification, the system disassociates the key from the email address and deletes the user account from Access Point.
What does the Purged Users icon do on the "Manage Users for Key" page?
Click the icon. This will open the "Purged Users for Key" page, which presents a list of email addresses associated with users who have not verified their Access Point accounts (set up passwords) within 30 days. After 30 days, the system deletes these accounts and frees up the subscription seats.
These users' accounts were created by the system administrator using the Associate Multiple Users to Key feature. If the newly created users fail to set up new passwords for their accounts within the 30-day verification period, the system deletes their USP Access Point accounts as well as their subscription key associations. The subscription seats for the deleted users become available for additional Access Point users.
Where can I view the total number of purchased seats for my organization?
The Total Seats column in the Admin tab indicates the total number of seats purchased for the subscribed product.
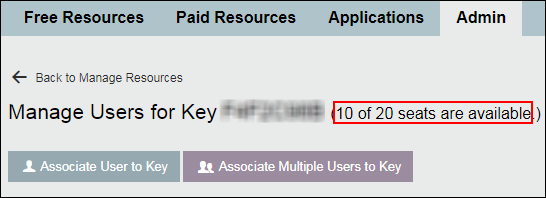
How will I know the number of remaining seats for my subscription?
Log in to Access Point. In the Admin tab, click the icon in the Manage Key column. The "Manage Users for Key" page opens. The heading of this page lists the number of available spots in the subscription. An example is shown below:
How do I create Access Point accounts for multiple users in my organization and assign them to the subscription key?
The button on the Admin tab of Access Point will allow the system admins to create multiple Access Point accounts and associate them with the subscription key in bulk or at one time.
To create multiple Access Point accounts and associate them with the subscription key:
- Log in to your Access Point account using the http://register.usp.org URL.
- Click the Admin tab and then click the icon. The "Manage Users for Key" page opens.
- Click the button.
- Click the template file link (see arrow above) to download the USP-provided Excel template. Note: You can only use the template provided by USP within this tool. Using another file format will result in an error message.
- Populate the Excel file with the users' information. When entering the user information in the Excel file, the following conditions must be met:
- All mandatory fields (marked with asterisk [*] in the column heading) must be filled.
- The email address should be entered in the correct format.
- Save the Excel file.
- Click the button to locate the file and then click the button.
- After successful upload, a message will appear at the top of the page.
- Refresh the page by pressing the
key on your keyboard. The added users will appear in the "Manage Users for Key" page list. The total number of seats for the subscription will also be updated to reflect the remaining seats.
Each newly created Access Point user will receive an email asking them to set up their Access Point account password. After they follow the directions to set up their password, they will be able to log in to Access Point and will have access to the product.
How do I disassociate a user from a subscription key?
To disassociate a user:
- Log in to Access Point using the https://register.usp.org URL.
- Click the Admin tab.
- Select the icon in the Manage Users column.
- In the "Manage Users for Key" page, either select a user in the list, or find a user using the Search field.
- Click the
 icon to remove the user's association with the subscription key. A confirmation message will appear.
Note: A system admin cannot be disassociated from the subscription key. - Click OK in the confirmation message. The user is removed from the subscription and can no longer access the product.
IMPORTANT: Although the user's Access Point account has been disassociated from the subscription key, the user's Access Point account will still be active.
Note: Once a user's account has been disassociated, you cannot view a list of the disassociated users in the Admin tool.
How do I download the USP-provided Excel file template to upload multiple users?
USP will provide an Excel file template that you MUST download and use for creating the user list. The template is available when you click the button on the "Manage Users for Key" page. Download the Excel file template and populate it with user information. When entering user information in the Excel file, the following conditions must be met:
- All mandatory fields (marked with asterisk [*] in the column heading) must be filled.
- The email address should be entered in the correct format.
Save the file. Refer Manage Users for Key for more details on uploading the file.
How do I generate a report of user data?
The Reports option will allow you to view usage/session reports of all users or of a specific user by the email address associated with the subscription key. You can generate report by specifying the time frame in the drop-down box and/or by entering the email address of an associated product’s user.

Click the Generate Report button to view report data of the user(s) in a table. You also have an option to view a detailed report with login and logout times of users by clicking the Show Detail Report checkbox. An example is shown below:
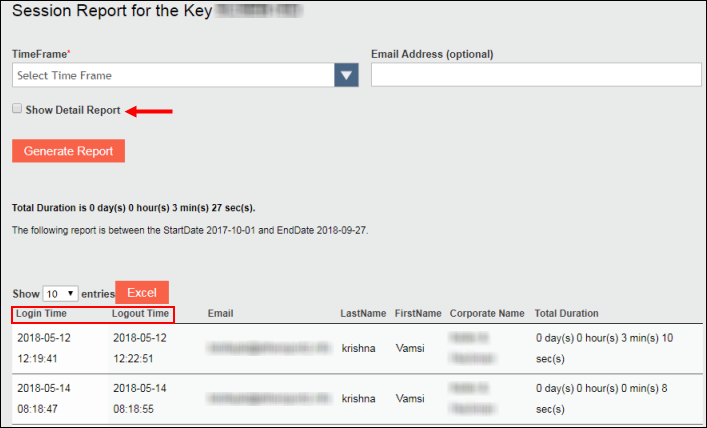
You can also download the report data in an Excel file by clicking the Excel button.
How do I transfer associated Access Point user accounts to a new subscription key?
Please refer to the attached PDF for detailed instructions.
When renewing subscription or receiving a new subscription key, how do I easily transfer all users to the new key? How can I use the Download All Users List feature?
Please refer to the attached PDF for detailed instructions.
What is the whitelist/blacklist feature?
When you want to add or exclude specific users and domain from the applications subscription, you can add them in the Admin tab of Access Point.
This ensures the added user can access the application and the excluded user is unable to access the application. This feature is also known as whitelist/blacklist feature.
For the added domain, any user with the domain email will be able to access the application if the maximum seat limit is not fulfilled.
For the excluded domain, any user with the domain email will not have access to the application.
Important: if a user is added to excluded list then to empty the seat, the admin must delete the user from the list. Even if a user is excluded, until and unless they are deleted from the seat, a seat will be occupied and will be counted towards the maximum limit.
How do I navigate to use the whitelist/blacklist feature?
To access this feature:
- Log in to the Access Point (https://register.usp.org).
- Click on the Admin tab.
- Click the key
 icon under the Manage key column.

- In the Manage Key page that opens, scroll down to see the Allowed Domain/Users and Excluded Domain/Users section.
- The Allowed Domain/Users is the whitelist feature.
- The Exclude Domain/Users list is the blacklist feature.
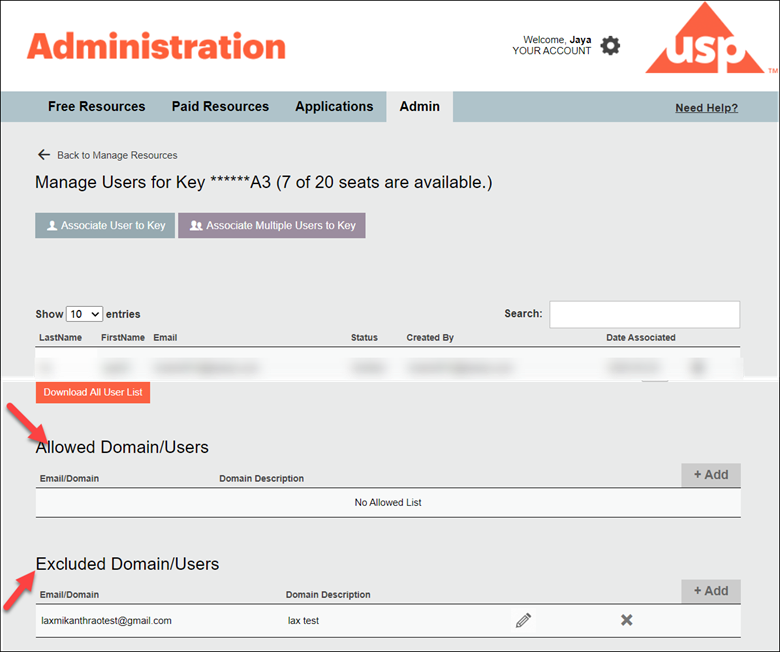
How do I allow/add specific users or domain to always access the USP publications or how do I use the Allowed Domain/Users (whitelist) feature?
The Allowed Domain/Users section is the whitelist feature and is located under the list of users for each subscription key under the Admins Manage Key column and is accessible by clicking the Key icon.

To whitelist or to allow either an individual email address or a domain to your subscription key:
- Click on the +Add button.

- Enter in the individual email address or the email domain under Email/Domain. Please note that the @ is not necessary if you are adding an email domain. For example, just enter google.com.
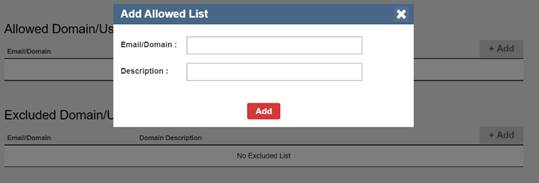
- Optionally, you can add a description of what you are adding if necessary.
- Click Add to add the entry in the list.

Once added, you can remove an individual user or an email domain by clicking on the x icon.
Once added, you can also edit an individual user or an email domain by clicking on the pencil icon.
How do I exclude users or domain from accessing the USP publications or how do I use the Excluded Domain/Users (whitelist) feature?
The Excluded Domain/Users section is the blacklist feature and is located under the list of users for each subscription key under the Admins Manage Key column and is accessible by clicking the Key icon.
To blacklist or block either an individual email address or a domain to your subscription key:
- Click on the +Add button.

- Enter in the individual email address or the email domain under Email/Domain. Please note that the @ is not necessary if you are adding an email domain. For example, just enter google.com.
- Optionally, you can add a description of what you are adding if necessary.
- Click Add to add the entry in the list.

Once added, you can remove an individual user or an email domain by clicking on the x icon.
Once added, you can also edit an individual user or an email domain by clicking on the pencil icon.
Note: If you exclude a domain, such as gmail.com and there are Access Point accounts associated to your subscription key with that domain, those users will not be able to login. The Admin will have to remove these accounts from the subscription key to free up the seats.